Showing posts with label free pattern. Show all posts

Tuesday, November 23, 2010

and another world is heard from

Sorry about disappearing for so long.  This weekend, my family and I put up the outside walls on the "let's not freeze our pipes" project.  It was long and grueling work, and I literally just fell into bed once we got done.  Saturday, my Dad, my brother and I cut, sawed, and hammered until just past dark.  I cursed my lack of height again.  If I were even 4 inches taller I would have been more helpful.  As it was, I wasn't tall enough to do as much as I wanted to (even with the ladder I was standing on).  Curse you, barely average height.  Curse you.

Anyway, Sunday I went outside with my husband and the littlest beast and we tyvek'd the outside of the porch.  We're now at a point to do flashing and then windows.  And then we get to do the short wall.  The end is in sight.

I haven't taken pictures of the project this time.  A giant square of tyvek didn't strike me as particularly moving progress, so I'm going to wait until the windows are in.  Instead, I'm posting the pattern for the first Serious Scarf for everyone to enjoy (hopefully:).

Without further ado, here's the basic pattern

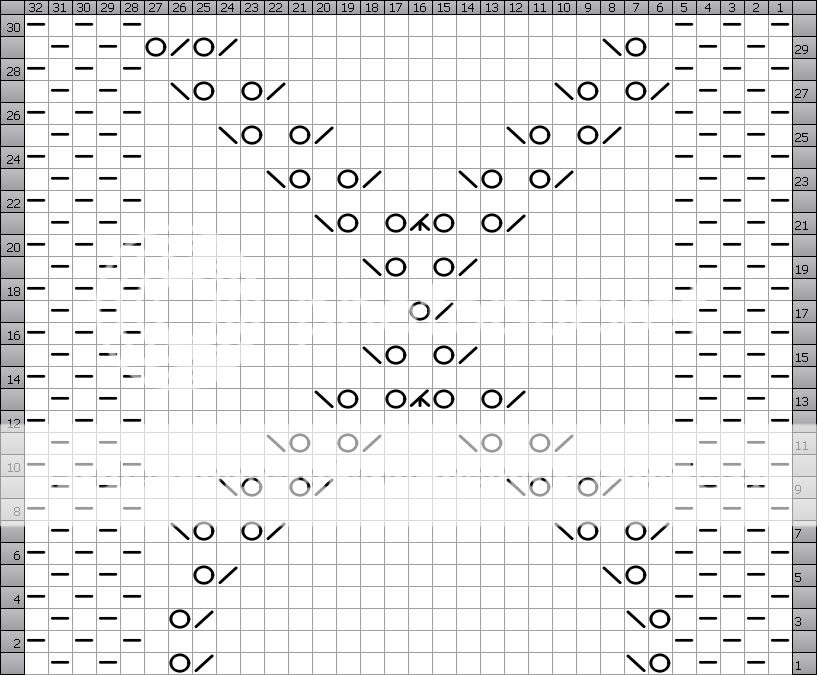
Charts are read from bottom to top, right to left (and then left to right).  Rows are numbered.
Here is the key so you can translate.

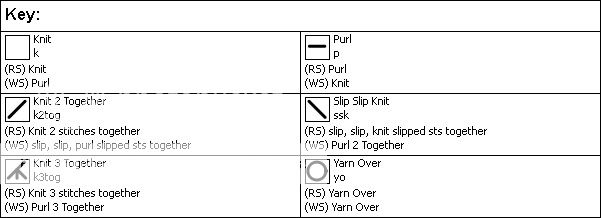
Key!  Feel free to print both.


So.  The edging of this scarf is simple seed/moss stitch (depending on locale).  There are 5 border stitches on each side, and the main pattern is 22 stitches wide.  You can make a scarf of pretty much any size just by multiplying 22x number of repeats and adding the border stitches.  There is one caveat.  In order for the textured part on the sizes to match, you will want to add an extra stitch to whatever count you come up with for your pattern.

What does this mean?  In the case of my Dad's scarf, I wanted 4 repeats.  So 22x4=88 stitches.  88 + 10 (border texture)= 98 stitches.  98+1=99 stitches to cast on.


After casting on 99 stitches (I used knitted cast on, but pretty  much any cast on you are comfortable with will work), I knit 7 rows in seed stitch (*(k1, p1)  *repeat (  ) to end).  The great thing about this texture stitch is it does not matter what row you're on, you'll always start with a knit stitch.  Front/back, they are the same.

After 7 rows, you will begin your right side pattern row;  however you have an extra stitch that will need to be removed in order for the borders to match.  What I did, is on row 7 I began the right side with k1, p1, k1, p1, K2TOG, and then began the center pattern.  This brought my stitch count back to 98, and made the borders match in a k1, p1, k1, p1, k1 pattern.

From here, I basically knit following the pattern until I was almost out of yarn.  I used roughly 1060 yards out of 1072 yards available;  8 skeins of Lark yarn from Quince and Co on size 6 needles.  I got 12 pattern repeats knit before I was close on yarn and needed to start the end border.  My finished dimensions were 92 inches x 32 inches wide, but you can change your dimensions by doing more or less repeats.

To finish the pattern, make sure you end your repeat on the row 30 of the chart.  You will be increasing one stitch across the top in order to bring you knitted width back to the odd number of stitches you started with (in my example that would be 99).  Personally, I just stuck an extra m1 in across the top of the right side row when I started across.  The picked up stitch is not visible, and it made the borders match.  Then I just knit 7 rows of seed stitch, and used a loose knitted bind off.  Et Voilla!  Block to desired measurements and give to someone you care for.

someone I care for
For those who aren't familiar with charts, here are the written instructions as well.  Please use the CO information from above to determine what size you want to make and the number of motif repeats you will be using.  Please be kind, I did this on the fly.  If you have any questions, feel free to ask :)  I know I can be a bit stream of consciousness.


Row 1 k1, p1, k1, p1, k1, *yo, ssk, k17, k2tog, yo, k1*   Repeat instructions between * for number of motifs desired, k1, p1, k1, p1, k1

Even Rows 2 -30 k1, p1, k1, p1, k1, p to last 5 stitches,  k1, p1, k1, p1, k1

Row 3 k1, p1, k1, p1, k1, *yo, ssk, k17, k2tog, yo, k1,* Repeat instructions between * for number of motifs desired, k1, p1, k1, p1, k1

Row 5 k1, p1, k1, p1, k1, *k1, yo, ssk, k15, k2tog, yo, k2,* Repeat instructions between * for number of motifs desired, k1,p1, k1, p1, k1

Row 7 k1, p1, k1, p1, k1, *k2tog, yo, k1, yo, ssk, k11, k2tog, yo, k1, yo, ssk, k1,* Repeat instructions between * for number of motifs desired, k1, p1, k1, p1, k1

Row 9 k1, p1, k1, p1, k1 *k2, k2tog, yo, k1, yo, ssk, k7, k2tog, yo, k1, yo, ssk, k3,* Repeat instructions between * for number of motifs desired, k1, p1, k1, p1, k1

Row 11 k1, p1, k1, p1, k1, *k4, k2tog, yo, k1, yo, ssk, k3, k2tog, yo, k1, yo, ssk, k5,* Repeat instructions between * for number of motifs desired, k1, p1, k1, p1, k1

Row 13 k1, p1, k1, p1, k1, *k6, k2tog, yo, k1, yo, k3tog, yo, k1, yo, ssk, k7,* Repeat instructions between * for number of motifs desired, k1, p1, k1, p1, k1

Row 15 k1, p1, k1, p1, k1, *k8, k2tog, yo, k1, yo, ssk, k9,* Repeat instructions between * for number of motifs desired, k1, p1, k1, p1, k1

Row 17 k1, p1, k1, p1,k1,  *k9, k2tog, yo, k11,* Repeat instructions between * for number of motifs desired, k1, p1, k1, p1, k1

Row 19 k1, p1, k1, p1, k1, *k8, k2tog, yo, k1, yo, ssk, k9,* Repeat instructions between * for number of motifs desired, k1, p1, k1, p1, k1

Row 21 k1, p1, k1, p1, k1, *k6, k2tog, yo, k1, yo, k3tog, yo, k1, yo, ssk, k7,* Repeat instructions between * for number of motifs desired p1, k1, p1, k1

Row 23 k1, p1, k1, p1, k1, *k4, k2tog, yo, k1, yo, ssk, k3, k2tog, yo, k1, yo, ssk, k5,* Repeat instructions between * for number of motifs desired , k1p1, k1, p1, k1

Row 25 k1, p1, k1, p1, k1,  *k2, k2tog, yo, k1, yo, ssk, k7, k2tog, yo, k1, yo, ssk, k3,* Repeat instructions between * for number of motifs desired  ,k1, p1, k1, p1, k1

Row 27 k1, p1, k1, p1, k1, *k2tog, yo, k1, yo, ssk, k11, k2tog, yo, k1, yo, ssk, k1,*  Repeat instructions between * for number of motifs desired,k1, p1, k1, p1, k1

Row 29 k1, p1, k1, p1, k1, *k1, yo, ssk, k15, k2tog, yo, k2tog, yo,* Repeat instructions between * for number of motifs desired, k1, p1, k1, p1, k1

Saturday, October 23, 2010

a good beginning

This shawl is a pattern I cobbled together using the free shawl pattern as it's base.  I just love that stitch pattern, and use it as often as I think I can get away with it.  I put this together about a year ago, combining a stitch pattern from Nancy Bush's Knitted Lace of Estonia with my favorite stitch.  I snatched one of the edgings from KLOE as well, and the finished project was born.  Since then, I have knit 5-6 of these in different weights.  I give them to people I care for.  My husband gives them to people without asking me.  They just seem to go poof, so I figured it'd be a good next shawl for the project while I'm working out patterns for test knitters and preparing to knit the next 5 designs. 

Unfortunately, I am only in the beginning stages of this shawl... so it looks exactly like the free shawl pattern.  For now!  In a few short repeats that will change dramatically, so I'll be chronicalling this one more closely. 

The yarn I am using is Quince & Co's Tern in driftwood.

This is what they look like in a pile sans flash
a little dark, but not far off

Here's what the started project looks like with flash
a little bright, but look at that stitch definition.  trust me it's there.
The manufacturer suggests size 1-3 needles for this, so I chose 3.  I'm something of a loose knitter, which is good for lace.  I think if I were to work with Tern again, I'd use a size 4 or 5 needle.  I like the drape of this yarn so far, and look forward to seeing how it blocks out.

In the meantime, I'm also trying a variation using Misti Alpaca baby alpaca lace, so as soon as I get a little progress on that I will take pictures of it as well.

I hope to do a giveaway in the next week, so keep your eyes peeled around Friday for photos and info about that.  I gathered the materials today, so I should be able to put them together properly, photograph them, and write it up.  I figure to be good to go no later than the 29th.

Monday, September 27, 2010

blocking, a fly-by with pictures

So, now that you've made this pile of limp noodles, now what?

First, soak the item. You can use almost any bucket/bowl/sink that holds water. Put in your favorite fibre cleaning stuff. I use Soak, which comes in many smells including unscented.

Depending on your fibre type, the length of time you let the item soak will vary.  Since this has silk in it, I don't let it soak any longer than 20 minutes.  Wool/camelid fibres take longer in order to saturate fully.

Carefully drain, and press out excess water.  If you have a lot of dye bleeding, I rinse in cool water until it runs clear.  It makes it easier to handle and I know it won't bleed on my clothing or towels by doing this.

Gather your materials together.
wet shawl, ruler, and pins
Get shawl as dry as possible by rolling it in a towel
pull into rough triangle on towel

Roll the shawl/towel into a towel burrito
mmm burrito
Roll Towel Burrito into thirds
You'll like what comes next.
Then put bundle on clean floor and step on it like you're stepping on grapes to make wine.  I know it sounds nuts, but it works very well and the towel will soak up the excess water and protect your knit.

I like to pin out the top of the shawl next.  Because I have my blocking wires available today, I decided to use them rather than pinning each picot out individually.  That is an option, or you can use a narrow cotton yarn (thin twine) and a yarn needle to thread the yarn through the tops of the picots the way I have done with the blocking wires.  It decreases the number of pins you'll use when blocking, and it is the Russian Method of blocking that was immortalized by the Yarn Harlot.  Seriously, check out her tutorial, it's worth every second.

I like to do each side out from the center.
This is what a full side done looks like:
1/2 of the top picots threaded
Do the second side the same way.  From here, I didn't get great pictures, but I like to put my blocking wires down the center to ensure a straight center stitch.  It isn't necessary to do this, you can do this using your ruler and pins.  I'm an overkill kind of gal.

See, Tpins!  And my Jammie legs!  Hmm, and the oldest son is stockpiling soda under his chair.
measure out both sides, and pin the edges
Measure down the center of the shawl
And Pin the Center out!
Add Ubiquitous T Pin!

Now, we do the fun part!
Measure out from the center motif, and Pin!
first one side
then the other!
you'll be pinning out back and forth.  You can use the ruler from center to edge tip to ensure a level triangle.
because of short time, I did 3 per side before moving to the other side
Then stand on your chair and take a crappy picture of the fully blocked shawl:
MMMM, Shawl!
Let dry fully, and unpin!!  Cackle gleefully, or y'know, just beam in pride.  You've successfully knit and blocked the free shawl pattern!

Saturday, September 25, 2010

In which Progress has happened

I thought this post would be about the picot edging I put along the tops of the shawls. Instead, the picot edge that never ends met with the concall that never ends and this is the result
I wish they showed better before blocking, but this will be light and lacy.


And number 2:
A more substantial yarn, this will be more solid than lacy, but is still lace knitting.


It was well after work when I took these, my flash wasn't behaving and I wasn't awake enough to make it better. Please bear with me.
In addition, you might remember this little beauty. She's been reworked and is much happier:
Oh I'm so happy this time.  This is my husband's favorite so far.

I have enough yarn left that I'm considering putting a tiny edging across the top as well. But look, she LIVES!
And finally, before I take my shortest of sons out to pick apples this morning, I have a little yarn porn to share:

So soft!  Colorway Rose Quartz
Yarny money shot!


This sexy little number is a linen/silk blend dyed by a local NH artist named Kim Kaslow. She runs an online shop called The Woolen Rabbit. Her color sense and depth are amazing. I've used her yarns previously, and loved every bit of them. I will do a more extensive about the yarn post on this yarn. I got 2 more skeins in this shipment, and each of them is exquisite.
So, look for an about the yarn on Malabrigo and Woolen Rabbit in the near future, as well as a completed shawls post with blocked items featuring Joie, Vines and Leaves, and the free pattern shawls. Lots to do!

Tuesday, September 21, 2010

progess on free pattern shawl

Just a quickie post today.  Here's the progress on the Lyndon Hill fern lace shawl:
five pattern repeats, fingering weight cotton & silk
And here's the Malabrigo Silky Merino progress:
five pattern repeats, dk weight wool & silk

So you can see the difference 5 repeats makes in dk vs 5 repeats in fingering, here's a comparison shot:
cute, aren't they?
The size difference starts to become noticible around this size:  you can see that the dk is slightly bigger than the fingering.

In other news, this:
Ok, he's cute too.  Those are MY work gloves he's wearing.
Happened today.  Bricks are moving to the back of the house.

One more for posterity
My men, hauling bricks!  Cute!
One of these weeks, I'll be putting in a brick patio.  I suspect it will interfere with knitting somewhat, but I'll keep the blog posted.

I'll have a better update tomorrow, and am hoping to find an update schedule that works for me but doesn't lose track of the progress I'm making.  Also on the plate for the blog are yarn reviews, more finished work, and possibly the addition of a shopping cart.  But that last one depends on me reading up on it, so we'll see on that.

Ta-ta.

Monday, September 20, 2010

Magic! Or how to start your lace pattern


Okay, we have our garter tab so let's start the pattern

Row 1 always starts knit 2 for the garter tab, and has a knit one in the middle for the center.

So for the right half of the shawl, you will knit 2, yarn over, knit 1, yarn over and then knit the center stitch like this:

right side through yarn over shown
Then to finish, you will repeat the pattern of yarn over, knit one, yarn over:  then the garter tab of knit 2. 

This knit 2 will be at the beginning and ending of every row, whether on the return (purl back) row or the pattern row.   So when thinking about the pattern, just remember that every beginning and ending 2 stitches are knit 2 regardless.

Pattern Row 2 looks a little funky, as it contains more yarn overs.  I put in stitch markers around the center stitch so you can see how it works out:

so, the pattern is like this to the center: garter tab k2, yo, k, yo,k, yo, k, yo, marker, center stitch, marker
Your stitches will be loopy and non-uniform.  This is normal, and it evens out as the knitting gets larger.  Blocking makes everything perfect.

Pattern Row 3, you start doing decreases.  This lace pattern uses knit 2 together and slip one knit one pass single stitch over to do your right and left leaning decreases.

row 3, showing the garter tab, the yo, the k2 and k1
After doing the return row, this is roughly what your knitting will look like

cute little crescent shape
Pattern Row 4 is worked the same as row 3, but the number of knit stitches increase.  So the pattern on the chart after the garter stitch and before the center stitch reads yo, k2tog, knit 2, yo, knit, yo, knit2, sl1 k1 psso, yo

Pattern Row 5 is where the pattern increase, and the shaping for the pattern below comes in.
garter tab, yo, k, yo, sl1 k1 psso (knit 5, k2tog, yo, k, yo)
This shows the increase and the beginning of the shaping.  It looks like the chart.  You can see how the decrease leans to the left, which will make up our leaf (or fern) edging.

Pattern row 6 introduces the way the pattern will be worked internally.  When doing an increase that is not on the edge, you will want the body of your fern (or leaf) to be right up against the decrease of the one below.  This makes a beautiful, subtle fabric.
Increase yo only happen on right for right increase, only on left for left increase:  garter, yo, k, yo, k, yo, k, sl1 k1 psso
You should be able to see the increase and lack of extra yo between pattern sections on the chart if you've been following it while reading this (you can save a copy off for reference :)


Pattern row 7 increases the same way as pattern row 3, so the edge near the yo that is handling the growth of the overall shawl does not get huge while the pattern inside does not grow. 

Pattern row 7 goes something like garter sts, yo, k2tog, k, yo, k, yo, knit 2, sl1 k1 psso.

This means that both sides of the leaf pattern have effectively 2 stitches (not counting the garter stitch or yo that separates the lace from the border) on each side of the center frond.  I keep it in mind that the pattern increase goes zero stitches, 1 stitch, 2 stitches, 3 stitches, and then the shaping decrease starts with the zero stitch increase on a new pattern row.

At Pattern row 8, we do something different.  This is our double decrease.

Your next pattern repeat is now at 3 stitches on each side of your center frond, and we begin the final decrease of the original leaf pattern.

Following the pattern up to the double decrease, we look like this:
see how the pattern on the row below leaves 3 stitches:  it was sl1 k1 psso, k, k2
We will slip one as if to knit, as we do in the single decrease sl1 k1 psso.
slip one as if to knit (do not knit it)
knit 2
the knit2 follow through
at this point, your decrease looks like this

pass single stitch over

completed left leaning double decrease


complete the row, purl back.

Now your knitting has the first repeat complete!!

Yay!  Well on your way!

Rejoice, reward yourself with chocolate, and be proud!  You've begun a lace journey that I hope you will enjoy!

I recommend printing out the pattern while reading the steps above.  Also, this mostly-finished piece should be a good reference:
center of finished lace piece, blocked.
I will be following along with this fingering weight yarn that I've started the instructions with, so I can give an approximate idea of how many repeats you can do out of 436 yards.  Plus, I'll have a blocking tutorial so that you can appreciate the beauty of what you've created.

Please let me know (in the comments or through email: marveloustoyATyahooDOTcom ... replace words with symbols) if you're trying this little project.  I'll help out as much as possible!

Also, I will be knitting a second one in DK weight Malabrigo as this progresses.  Stay tuned to see how it turns out.

mmm, silk & wool yarn porn :)

casting on: the first adventure. Picture heavy

I like to use the turkish cast on for garter stitch shawls.  The artist behind badcat designs came up with a way to do a provisional cast on for the turkish cast on, which means every garter row creates that little line between them.  If you just cast on for a tab, and then pick up stitches without using a provisional cast on, you are missing one of the garter ridges.

So, step 1 choose your materials.  In order to make these instructions work for the yarn I foisted yesterday, I have dug out the exact yarn in the exact amount.  This is Lyndon Hill (Bristol Yarn Gallery), an 85% pima cotton, 15% silk blend.  There are approx 218 yards per 50g hank.  I chose a melon color that I have 2 hanks of, the lovely lady I nudged into buying the same has a gorgeous purple color to work with.

Here's what I'm working with.

size 4 circular needle & 2 size 4 dpns for the cast on
Step 2, ball your yarn.
This may seem like an obvious step, but if you buy your yarn in hanks as above, you will want to make a ball out of your yarn.  Working from a hank is a good way to get tangles.  I have a swift and ball-winder, so I made this to work from.

any method of balling will reduce tangles and increase knitting enjoyment

From here, you will be using a 2 needle cast on.  Sounds hard, but I promise it's simple.  It just isn't simple to photograph by myself, so please bear with my pictures.

Casting on:

Step 1, put dpn and one side of circular knitting needle together.  Create slip knot (noose loop?), and put over both needles at once.

step 1, slip knot over 2 needles
Step 2:  Make a backwards loop using the working yarn (let the loose end dangle) over both needles.

A second loop is added, this will be your first working loop.
Step 3.  Repeat until you have a garter tab size you like.  I'm using 2 stitches for this shawlette, however if you're just beginning you may want to use 3 or even 4 stitches so you have more to hold onto until you get more practice.

One slip knot, 2 working stitches (slip knot on left)
Now we begin the garter stitch border:
Step 1, remove slip knot from left end of both dpn and needle, move work to center of both the dpn and circular cord.  You will have 2 large loops on the needles, with your beginning yarn on the left and your working yarn on the right.

Caution:  Do not put your work down, it is easy to twist your garter tab.  So you want to make sure that you get to the end of these steps before you set it down.

beginning yarn on left of work, working yarn on right
Step 2, with 2nd double point needle, knit across 2 (or however many you cast on) stitches.  This creates a garter ridge, which will keep the top of the shawl consistent. 

first garter.
Now the working yarn is on the same side as the starting yarn.

Step 3:  Turn your work, and knit back 7 more times, being careful not to twist.  This will look like this:.

8 knit rows.   Your beginning thread will be on right side of garter tab, working yarn on left.
Step 4, move your circular needle so that the needle portion is parallel with the dpn, and turn your work so that the garter stitch creates the bar of an H between them.
Circular needle on left, dpn on right, working yarn on right top, starting yarn on left bottom

Step 5, pick up 3 stitches across garter tab between garter ridges

knit 2 (garter tab) pick up 3, knit 2 to finish row
This will put all of the stitches on your dpn.  Give a gentle tug to the center of the garter row:  it will help even the stitches up.

Since you'll be moving to a circular needle for growing, knit back across the row as follows using your circular needle.  Knit 2, perl 3, knit 2.

Next post, starting the pattern.