Some of the folks who know me outside of the electric box know that we lost my grandmother on Saturday. To that end, I am moving around some of my projects and designing something in her honor. The projects I've already got on the needles will continue to be worked, and I will get around to real shots before the sun burns out (I swear), but this is something important to me so it will be bumped up the project queue.
Good Health to you and yours
--Constantly Knitting
Thursday, September 30, 2010
so of course it rains
 | |
| beebo swatch |
 |
| detail of vine work |
 |
| taken mid-block, not representative of how it dried |
I thought I could get some shots today, however it's pouring... so back to the knitting board.
Wednesday, September 29, 2010
another wednesday, another missed photo opportunity
I was planning on taking some shots today since it's GORGEOUS outside and I have a metric ton (okay, 4) of finished items to take pictures of.
I'll beg indulgence since my husband is not going to be home tonight (it's Man Night... otherwise known as DnD night) so I won't have the free time I need to post or photograph properly.
I'm praying for a clear day tomorrow and will have a bunch o finished items to share. I'm pleased and proud of the progress and hope you'll enjoy them too once I get my shots.
Monday, September 27, 2010
so no $h1t & there I was
Once upon a time, I knew a guy who started all of his stories with the title of this post. So I share with you.
While I'm doing the crazy blocking, I am also doing the knitting. I liked the vines and leaves shawl and the autumn glow shawl so much that I decided to do sister shawls in rectangle. Here's how they are coming along:
The one that I started with is the autumn glow sister wrap. Since Autumn Glow was done in a sexy variegated yarn, I chose a single color yarn in a muted green. It has cashmere in it, so it is looooovely to knit.
Details:
For the vines and leaves sister wrap, which was knit in a plain color silk and cotton, I chose a lovely variegated yarn. It is merino, kid mohair and nylon. I don't enjoy working with yarns with nylon in them. This one is no exception. I find them to be less soft than a plain merino, and feel a little wirey to work with. On the other hand, one of my favorite personal shawls is knit from a zauberball yarn which has nylon in it, and the color depth and the resiliance of the yarn makes it great for my lifestyle. I think once knitting is finished, this will be a lovely favorite too.
Up close:

I can't wait to get more than 3 inches knit on this, it's even more beautiful in person than this photo captures. These are both a simple knit. I'm considering putting out patterns from the 200 shawl project if people like the shawls that are knit. But, I still have a ton of work on the part of the project that I already committed to. I have signed up for an account through artfire so I can put up the finished shawls for sale and just need to get some really good shots and get them up.
I guess we'll see how it goes!
But it's all for these guys, so I will get it done!
While I'm doing the crazy blocking, I am also doing the knitting. I liked the vines and leaves shawl and the autumn glow shawl so much that I decided to do sister shawls in rectangle. Here's how they are coming along:
 |
| Different Greens! |
Details:
 |
| so so soft |
Up close:
I can't wait to get more than 3 inches knit on this, it's even more beautiful in person than this photo captures. These are both a simple knit. I'm considering putting out patterns from the 200 shawl project if people like the shawls that are knit. But, I still have a ton of work on the part of the project that I already committed to. I have signed up for an account through artfire so I can put up the finished shawls for sale and just need to get some really good shots and get them up.
I guess we'll see how it goes!
But it's all for these guys, so I will get it done!
 |
| My sons. Love! |
blocking, a fly-by with pictures
So, now that you've made this pile of limp noodles, now what?
First, soak the item. You can use almost any bucket/bowl/sink that holds water. Put in your favorite fibre cleaning stuff. I use Soak, which comes in many smells including unscented.
Depending on your fibre type, the length of time you let the item soak will vary. Since this has silk in it, I don't let it soak any longer than 20 minutes. Wool/camelid fibres take longer in order to saturate fully.
Carefully drain, and press out excess water. If you have a lot of dye bleeding, I rinse in cool water until it runs clear. It makes it easier to handle and I know it won't bleed on my clothing or towels by doing this.
Gather your materials together.
Get shawl as dry as possible by rolling it in a towel
Roll the shawl/towel into a towel burrito
Roll Towel Burrito into thirds
Then put bundle on clean floor and step on it like you're stepping on grapes to make wine. I know it sounds nuts, but it works very well and the towel will soak up the excess water and protect your knit.
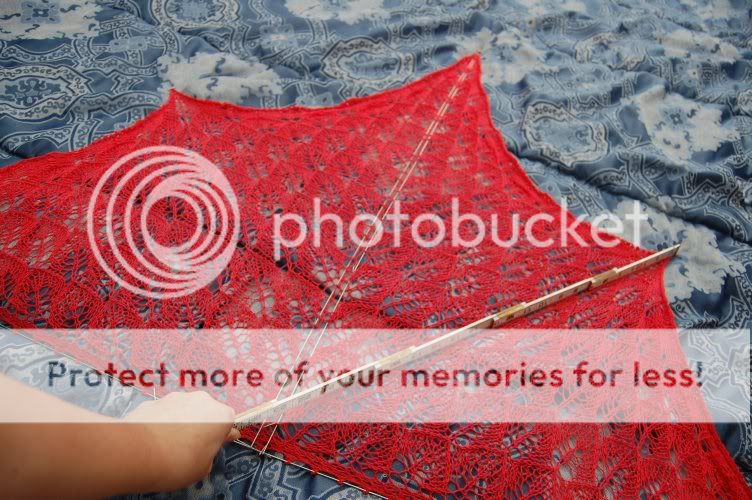
I like to pin out the top of the shawl next. Because I have my blocking wires available today, I decided to use them rather than pinning each picot out individually. That is an option, or you can use a narrow cotton yarn (thin twine) and a yarn needle to thread the yarn through the tops of the picots the way I have done with the blocking wires. It decreases the number of pins you'll use when blocking, and it is the Russian Method of blocking that was immortalized by the Yarn Harlot. Seriously, check out her tutorial, it's worth every second.
This is what a full side done looks like:
Do the second side the same way. From here, I didn't get great pictures, but I like to put my blocking wires down the center to ensure a straight center stitch. It isn't necessary to do this, you can do this using your ruler and pins. I'm an overkill kind of gal.
Measure down the center of the shawl
 And Pin the Center out!
Now, we do the fun part!
Measure out from the center motif, and Pin!
you'll be pinning out back and forth. You can use the ruler from center to edge tip to ensure a level triangle.
Then stand on your chair and take a crappy picture of the fully blocked shawl:
Let dry fully, and unpin!! Cackle gleefully, or y'know, just beam in pride. You've successfully knit and blocked the free shawl pattern!
First, soak the item. You can use almost any bucket/bowl/sink that holds water. Put in your favorite fibre cleaning stuff. I use Soak, which comes in many smells including unscented.
Depending on your fibre type, the length of time you let the item soak will vary. Since this has silk in it, I don't let it soak any longer than 20 minutes. Wool/camelid fibres take longer in order to saturate fully.
Carefully drain, and press out excess water. If you have a lot of dye bleeding, I rinse in cool water until it runs clear. It makes it easier to handle and I know it won't bleed on my clothing or towels by doing this.
Gather your materials together.
 |
| wet shawl, ruler, and pins |
 | ||
| pull into rough triangle on towel |
 |
| mmm burrito |
 |
| You'll like what comes next. |
I like to pin out the top of the shawl next. Because I have my blocking wires available today, I decided to use them rather than pinning each picot out individually. That is an option, or you can use a narrow cotton yarn (thin twine) and a yarn needle to thread the yarn through the tops of the picots the way I have done with the blocking wires. It decreases the number of pins you'll use when blocking, and it is the Russian Method of blocking that was immortalized by the Yarn Harlot. Seriously, check out her tutorial, it's worth every second.
 |
| I like to do each side out from the center. |
 |
| 1/2 of the top picots threaded |
 |
| See, Tpins! And my Jammie legs! Hmm, and the oldest son is stockpiling soda under his chair. |
 |
| measure out both sides, and pin the edges |
 |
| Add Ubiquitous T Pin! |
Now, we do the fun part!
Measure out from the center motif, and Pin!
 |
| first one side |
 |
| then the other! |
 |
| because of short time, I did 3 per side before moving to the other side |
 | |
| MMMM, Shawl! |
Saturday, September 25, 2010
In which Progress has happened
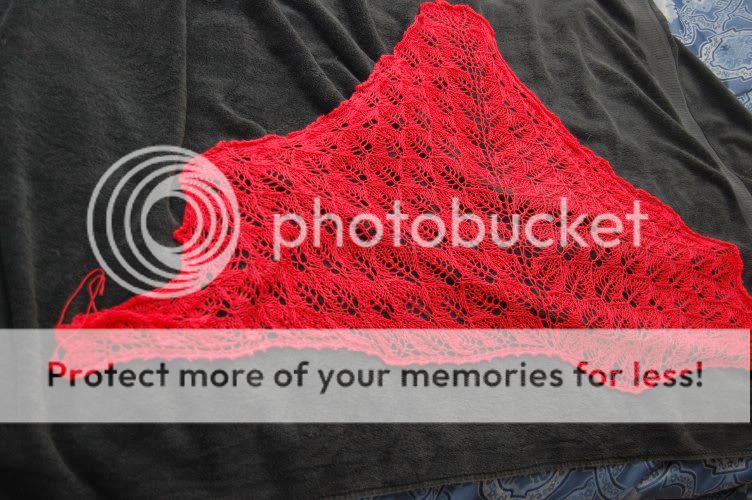
I thought this post would be about the picot edging I put along the tops of the shawls. Instead, the picot edge that never ends met with the concall that never ends and this is the result
And number 2:
It was well after work when I took these, my flash wasn't behaving and I wasn't awake enough to make it better. Please bear with me.
In addition, you might remember this little beauty. She's been reworked and is much happier:
I have enough yarn left that I'm considering putting a tiny edging across the top as well. But look, she LIVES!
And finally, before I take my shortest of sons out to pick apples this morning, I have a little yarn porn to share:
This sexy little number is a linen/silk blend dyed by a local NH artist named Kim Kaslow. She runs an online shop called The Woolen Rabbit. Her color sense and depth are amazing. I've used her yarns previously, and loved every bit of them. I will do a more extensive about the yarn post on this yarn. I got 2 more skeins in this shipment, and each of them is exquisite.
So, look for an about the yarn on Malabrigo and Woolen Rabbit in the near future, as well as a completed shawls post with blocked items featuring Joie, Vines and Leaves, and the free pattern shawls. Lots to do!
 |
| I wish they showed better before blocking, but this will be light and lacy. |
And number 2:
 |
| A more substantial yarn, this will be more solid than lacy, but is still lace knitting. |
It was well after work when I took these, my flash wasn't behaving and I wasn't awake enough to make it better. Please bear with me.
In addition, you might remember this little beauty. She's been reworked and is much happier:
 |
| Oh I'm so happy this time. This is my husband's favorite so far. |
I have enough yarn left that I'm considering putting a tiny edging across the top as well. But look, she LIVES!
And finally, before I take my shortest of sons out to pick apples this morning, I have a little yarn porn to share:
 |
| So soft! Colorway Rose Quartz |
 |
| Yarny money shot! |
This sexy little number is a linen/silk blend dyed by a local NH artist named Kim Kaslow. She runs an online shop called The Woolen Rabbit. Her color sense and depth are amazing. I've used her yarns previously, and loved every bit of them. I will do a more extensive about the yarn post on this yarn. I got 2 more skeins in this shipment, and each of them is exquisite.
So, look for an about the yarn on Malabrigo and Woolen Rabbit in the near future, as well as a completed shawls post with blocked items featuring Joie, Vines and Leaves, and the free pattern shawls. Lots to do!
Thursday, September 23, 2010
About the Yarn part deux
Today's about the yarn is brought to you by the fibre content 85 % cotton and the fibre content 15% silk.
I purchased this yarn at the Woolery a few weeks ago. I am using color 109 for the leaves and vines shawl, and 105 (aptly named watermelon) for the free pattern I put up the other day.
I know I sang faint praises of this yarn earlier, but let me break it down.
I usually HATE working with cotton yarns. I find them heavy, splitty, and usually not soft enough to work with for long periods of time.
That being said, I love this yarn. I don't know if it's the inclusion of the silk, or the tightness of the twist, or if it's something magic that I can't put a finger on; this yarn has been a pleasure to work with. It is soft, light, and it moves well through my fingers. It does have a very faint halo. Not something really noticible until you work on this without making sure your nails are 100% split free. I had a nail split a little bit while working on the shawl. Before I noticed, I had caught a tiny bit of the halo in my split nail (naturally). A quick nail filing later, and I was no longer in danger of snags, but it's worth noting that the halo is there. Personally, I find it pleasant.
The knitted fabric of both of the shawls is soft and springy. The silk content gives it a bit more silkiness than I'm used to in my cottons, and I find myself randomly fondling the knits when I think about where to go with it or evaluate how many more repeats I should do before I need to switch patterns or bind off. The fact that my inappropriate touching of the knitted fabric hasn't caused pilling or any kind of wear speaks well for the durability of the yarn.
The color depth that is achieved in this is nice. I love both of the colors I have on the needles so far, and I have the luxury of a sky blue, a copper, and a purple waiting for me. I look forward to working with all of them.
I will update this post with information on how well this yarn blocks in roughly 2 days. I don't suspect knitting on cold medicine would go any better than knitting on wine, opiates, or a pack of 2 year olds on sugar. That last one is pretty devastating on knitting, for the record.
All in all, I would recommend this yarn. My local yarn shop is not currently carrying this, they have moved to their autumn and winter weight yarns. However, you can get it from this direct link if you like the sound of it. They are a good online shop, and I have heard that their physical store is something that blows knitter minds. They're too far for me to go to without making a special trip, so I can't comment on their physical shop, but I do know that their online presence and customer service are excellent.
Tomorrow: this is the picot edge that never ends.....
Updated to add:
Blocking this, it is definitely a cotton/silk blend. It doesn't stretch as nicely as a wool, but it has incredible stitch definition. This is a stiffer fabric than the other shawls I've knit to this point, and that's thanks to the cotton content. It's just not as fluid as alpaca... but then a lot of fibres are not as fluid as alpaca. On the other hand, it's by no means a stiff fabric once knit up. It does block well, but it takes more coaxing than an animal fibre will. All in all, I'm pleased with it even after blocking
I purchased this yarn at the Woolery a few weeks ago. I am using color 109 for the leaves and vines shawl, and 105 (aptly named watermelon) for the free pattern I put up the other day.
 | |||||
| greeeeeen (progress shots on the re-knit in a later blog post) |
 |
| piiiiiiiink (watermelon, doing interminable picot edging, progress shots later blog post) |
I know I sang faint praises of this yarn earlier, but let me break it down.
I usually HATE working with cotton yarns. I find them heavy, splitty, and usually not soft enough to work with for long periods of time.
That being said, I love this yarn. I don't know if it's the inclusion of the silk, or the tightness of the twist, or if it's something magic that I can't put a finger on; this yarn has been a pleasure to work with. It is soft, light, and it moves well through my fingers. It does have a very faint halo. Not something really noticible until you work on this without making sure your nails are 100% split free. I had a nail split a little bit while working on the shawl. Before I noticed, I had caught a tiny bit of the halo in my split nail (naturally). A quick nail filing later, and I was no longer in danger of snags, but it's worth noting that the halo is there. Personally, I find it pleasant.
The knitted fabric of both of the shawls is soft and springy. The silk content gives it a bit more silkiness than I'm used to in my cottons, and I find myself randomly fondling the knits when I think about where to go with it or evaluate how many more repeats I should do before I need to switch patterns or bind off. The fact that my inappropriate touching of the knitted fabric hasn't caused pilling or any kind of wear speaks well for the durability of the yarn.
The color depth that is achieved in this is nice. I love both of the colors I have on the needles so far, and I have the luxury of a sky blue, a copper, and a purple waiting for me. I look forward to working with all of them.
I will update this post with information on how well this yarn blocks in roughly 2 days. I don't suspect knitting on cold medicine would go any better than knitting on wine, opiates, or a pack of 2 year olds on sugar. That last one is pretty devastating on knitting, for the record.
All in all, I would recommend this yarn. My local yarn shop is not currently carrying this, they have moved to their autumn and winter weight yarns. However, you can get it from this direct link if you like the sound of it. They are a good online shop, and I have heard that their physical store is something that blows knitter minds. They're too far for me to go to without making a special trip, so I can't comment on their physical shop, but I do know that their online presence and customer service are excellent.
Tomorrow: this is the picot edge that never ends.....
Updated to add:
Blocking this, it is definitely a cotton/silk blend. It doesn't stretch as nicely as a wool, but it has incredible stitch definition. This is a stiffer fabric than the other shawls I've knit to this point, and that's thanks to the cotton content. It's just not as fluid as alpaca... but then a lot of fibres are not as fluid as alpaca. On the other hand, it's by no means a stiff fabric once knit up. It does block well, but it takes more coaxing than an animal fibre will. All in all, I'm pleased with it even after blocking
Wednesday, September 22, 2010
Deferrment
I forgot today is Wednesday. My husband is out tonight, so I'm alone with ill kids and cranky animals. I will update tomorrow morning, as the current situation doesn't lend itself to any proper updating.
Tuesday, September 21, 2010
progess on free pattern shawl
Just a quickie post today. Here's the progress on the Lyndon Hill fern lace shawl:
And here's the Malabrigo Silky Merino progress:
So you can see the difference 5 repeats makes in dk vs 5 repeats in fingering, here's a comparison shot:
The size difference starts to become noticible around this size: you can see that the dk is slightly bigger than the fingering.
In other news, this:
Happened today. Bricks are moving to the back of the house.
One more for posterity
One of these weeks, I'll be putting in a brick patio. I suspect it will interfere with knitting somewhat, but I'll keep the blog posted.
I'll have a better update tomorrow, and am hoping to find an update schedule that works for me but doesn't lose track of the progress I'm making. Also on the plate for the blog are yarn reviews, more finished work, and possibly the addition of a shopping cart. But that last one depends on me reading up on it, so we'll see on that.
Ta-ta.
 |
| five pattern repeats, fingering weight cotton & silk |
 |
| five pattern repeats, dk weight wool & silk |
So you can see the difference 5 repeats makes in dk vs 5 repeats in fingering, here's a comparison shot:
 |
| cute, aren't they? |
In other news, this:
 |
| Ok, he's cute too. Those are MY work gloves he's wearing. |
One more for posterity
 |
| My men, hauling bricks! Cute! |
I'll have a better update tomorrow, and am hoping to find an update schedule that works for me but doesn't lose track of the progress I'm making. Also on the plate for the blog are yarn reviews, more finished work, and possibly the addition of a shopping cart. But that last one depends on me reading up on it, so we'll see on that.
Ta-ta.
Monday, September 20, 2010
Magic! Or how to start your lace pattern
Okay, we have our garter tab so let's start the pattern
Row 1 always starts knit 2 for the garter tab, and has a knit one in the middle for the center.
So for the right half of the shawl, you will knit 2, yarn over, knit 1, yarn over and then knit the center stitch like this:
 |
| right side through yarn over shown |
This knit 2 will be at the beginning and ending of every row, whether on the return (purl back) row or the pattern row. So when thinking about the pattern, just remember that every beginning and ending 2 stitches are knit 2 regardless.
Pattern Row 2 looks a little funky, as it contains more yarn overs. I put in stitch markers around the center stitch so you can see how it works out:
 |
| so, the pattern is like this to the center: garter tab k2, yo, k, yo,k, yo, k, yo, marker, center stitch, marker |
Pattern Row 3, you start doing decreases. This lace pattern uses knit 2 together and slip one knit one pass single stitch over to do your right and left leaning decreases.
 |
| row 3, showing the garter tab, the yo, the k2 and k1 |
 |
| cute little crescent shape |
Pattern Row 5 is where the pattern increase, and the shaping for the pattern below comes in.
 |
| garter tab, yo, k, yo, sl1 k1 psso (knit 5, k2tog, yo, k, yo) |
Pattern row 6 introduces the way the pattern will be worked internally. When doing an increase that is not on the edge, you will want the body of your fern (or leaf) to be right up against the decrease of the one below. This makes a beautiful, subtle fabric.
 |
| Increase yo only happen on right for right increase, only on left for left increase: garter, yo, k, yo, k, yo, k, sl1 k1 psso |
Pattern row 7 increases the same way as pattern row 3, so the edge near the yo that is handling the growth of the overall shawl does not get huge while the pattern inside does not grow.
Pattern row 7 goes something like garter sts, yo, k2tog, k, yo, k, yo, knit 2, sl1 k1 psso.
This means that both sides of the leaf pattern have effectively 2 stitches (not counting the garter stitch or yo that separates the lace from the border) on each side of the center frond. I keep it in mind that the pattern increase goes zero stitches, 1 stitch, 2 stitches, 3 stitches, and then the shaping decrease starts with the zero stitch increase on a new pattern row.
At Pattern row 8, we do something different. This is our double decrease.
Your next pattern repeat is now at 3 stitches on each side of your center frond, and we begin the final decrease of the original leaf pattern.
Following the pattern up to the double decrease, we look like this:
 |
| see how the pattern on the row below leaves 3 stitches: it was sl1 k1 psso, k, k2 |
 |
| slip one as if to knit (do not knit it) |
 |
| knit 2 |
 |
| the knit2 follow through |
 |
| at this point, your decrease looks like this |
 |
| pass single stitch over |
 |
| completed left leaning double decrease |
complete the row, purl back.
Now your knitting has the first repeat complete!!
 | ||
| Yay! Well on your way! |
Rejoice, reward yourself with chocolate, and be proud! You've begun a lace journey that I hope you will enjoy!
I recommend printing out the pattern while reading the steps above. Also, this mostly-finished piece should be a good reference:
 |
| center of finished lace piece, blocked. |
Please let me know (in the comments or through email: marveloustoyATyahooDOTcom ... replace words with symbols) if you're trying this little project. I'll help out as much as possible!
Also, I will be knitting a second one in DK weight Malabrigo as this progresses. Stay tuned to see how it turns out.
 |
| mmm, silk & wool yarn porn :) |
casting on: the first adventure. Picture heavy
I like to use the turkish cast on for garter stitch shawls. The artist behind badcat designs came up with a way to do a provisional cast on for the turkish cast on, which means every garter row creates that little line between them. If you just cast on for a tab, and then pick up stitches without using a provisional cast on, you are missing one of the garter ridges.
So, step 1 choose your materials. In order to make these instructions work for the yarn I foisted yesterday, I have dug out the exact yarn in the exact amount. This is Lyndon Hill (Bristol Yarn Gallery), an 85% pima cotton, 15% silk blend. There are approx 218 yards per 50g hank. I chose a melon color that I have 2 hanks of, the lovely lady I nudged into buying the same has a gorgeous purple color to work with.
Here's what I'm working with.
Step 2, ball your yarn.
This may seem like an obvious step, but if you buy your yarn in hanks as above, you will want to make a ball out of your yarn. Working from a hank is a good way to get tangles. I have a swift and ball-winder, so I made this to work from.
From here, you will be using a 2 needle cast on. Sounds hard, but I promise it's simple. It just isn't simple to photograph by myself, so please bear with my pictures.
Casting on:
Step 1, put dpn and one side of circular knitting needle together. Create slip knot (noose loop?), and put over both needles at once.
Step 2: Make a backwards loop using the working yarn (let the loose end dangle) over both needles.
Step 3. Repeat until you have a garter tab size you like. I'm using 2 stitches for this shawlette, however if you're just beginning you may want to use 3 or even 4 stitches so you have more to hold onto until you get more practice.
Now we begin the garter stitch border:
Step 1, remove slip knot from left end of both dpn and needle, move work to center of both the dpn and circular cord. You will have 2 large loops on the needles, with your beginning yarn on the left and your working yarn on the right.
Caution: Do not put your work down, it is easy to twist your garter tab. So you want to make sure that you get to the end of these steps before you set it down.
Step 2, with 2nd double point needle, knit across 2 (or however many you cast on) stitches. This creates a garter ridge, which will keep the top of the shawl consistent.
Now the working yarn is on the same side as the starting yarn.
Step 3: Turn your work, and knit back 7 more times, being careful not to twist. This will look like this:.
Step 4, move your circular needle so that the needle portion is parallel with the dpn, and turn your work so that the garter stitch creates the bar of an H between them.
Step 5, pick up 3 stitches across garter tab between garter ridges
This will put all of the stitches on your dpn. Give a gentle tug to the center of the garter row: it will help even the stitches up.
Since you'll be moving to a circular needle for growing, knit back across the row as follows using your circular needle. Knit 2, perl 3, knit 2.
Next post, starting the pattern.
So, step 1 choose your materials. In order to make these instructions work for the yarn I foisted yesterday, I have dug out the exact yarn in the exact amount. This is Lyndon Hill (Bristol Yarn Gallery), an 85% pima cotton, 15% silk blend. There are approx 218 yards per 50g hank. I chose a melon color that I have 2 hanks of, the lovely lady I nudged into buying the same has a gorgeous purple color to work with.
Here's what I'm working with.
 | |
| size 4 circular needle & 2 size 4 dpns for the cast on |
This may seem like an obvious step, but if you buy your yarn in hanks as above, you will want to make a ball out of your yarn. Working from a hank is a good way to get tangles. I have a swift and ball-winder, so I made this to work from.
 |
| any method of balling will reduce tangles and increase knitting enjoyment |
From here, you will be using a 2 needle cast on. Sounds hard, but I promise it's simple. It just isn't simple to photograph by myself, so please bear with my pictures.
Casting on:
Step 1, put dpn and one side of circular knitting needle together. Create slip knot (noose loop?), and put over both needles at once.
 |
| step 1, slip knot over 2 needles |
 |
| A second loop is added, this will be your first working loop. |
 |
| One slip knot, 2 working stitches (slip knot on left) |
Step 1, remove slip knot from left end of both dpn and needle, move work to center of both the dpn and circular cord. You will have 2 large loops on the needles, with your beginning yarn on the left and your working yarn on the right.
Caution: Do not put your work down, it is easy to twist your garter tab. So you want to make sure that you get to the end of these steps before you set it down.
 |
| beginning yarn on left of work, working yarn on right |
 |
| first garter. |
Step 3: Turn your work, and knit back 7 more times, being careful not to twist. This will look like this:.
 |
| 8 knit rows. Your beginning thread will be on right side of garter tab, working yarn on left. |
 |
| Circular needle on left, dpn on right, working yarn on right top, starting yarn on left bottom |
Step 5, pick up 3 stitches across garter tab between garter ridges
 |
| knit 2 (garter tab) pick up 3, knit 2 to finish row |
Since you'll be moving to a circular needle for growing, knit back across the row as follows using your circular needle. Knit 2, perl 3, knit 2.
Next post, starting the pattern.
Subscribe to:
Posts (Atom)